Frequently Asked Questions
We are sorry to see you leave us. If you do want to cancel our service, you need to phone in and speak with a Link Telecom service representative in order to cancel. We need to speak with you to validate that you are the actual account holder. Please note, we cannot accept any service cancellations by Chat or by Email. If you do send in a request for service cancellation by Chat or Email, we will be unable to process it.
Prepaid services mean, you will pay for the services in advance to ensure you have 30 days of service. Due date for payment is made on/before the service date. If you forget to pay, chances are that your services will be temporarily suspended until payment is made to your account.
The 1080p HD streaming on YouTube or NETLIFX requires 5.0 Mbps (Megabits per second) stable connection while the 4K UHD streaming needs AT LEAST minimum a 25.0 Mbps (Megabits per second) stable connection. If you have a 25M internet plan with us, you may not be able to watch 4K UHD video smoothly because any fluctuation of your downloading speed will cause buffering for 4K video streaming. We recommend to have at least 50 Mbps downloading speed to watch the 4K video.
Link Telecom contracts Bell Technicians to install the internet service and dry loop line, and their responsibility is only to install the dry loop to the demarcation point. For other requests, such as installing additional wall jacks and wires, there would be a separate charge.
Please inform Link Telecom 14 business days before your preferred moving date. Please be advised that we are not responsible for the service expense which was caused by the delay of the installation at the new service address. Also, the actual move appointment time may vary from your preference.
Yes, we advise that customers or someone over the age of 18 be physically present on-site during the installation so that there are no delays. If the customer misses technician’s visit, the date of reschedule has to be at least 5 days away from previous installation day.
No, they cannot. Link Telecom provides third party internet access. This means that we make use of the incumbent providers’ (Bell, Rogers, etc.) wiring to your home and in turn must use their installation technicians. As a result of this, it is not possible to supply the technician with your hardware. It must be shipped to the post office that serves your address or picked up from our main office.
DSL services in Ontario & Quebec can be activated after 7 days (including Saturday) of ordering day. Installations cannot be performed on Statutory Holidays or Sundays.
Cable (Rogers service region) services in Ontario can be activated after 3 days (including Saturday) of ordering day.
Cable (Ceogeco service region) services in Ontario can be activated after 14days (including Saturday) of ordering day.
By default, we use Canada Post expedited service to ship your modem. Our standard shipping rate is $10 + tax(Canada Post Expedited). The average delivery time for our standard Canada Post Expedited shipping is 3-5 business days.Canada Post will deliver a notice card advising when and where (usually your nearest post office) the modem can be picked up from. It will not be shipped directly to your home.
Visit www.speedtest.net or fast.com
Click GO to start the test.
Our billing cycle is 30 days. The first invoice will be generated on the first day when the service is successfully installed. The second invoice and subsequent invoices will be generated 25 days before the next billing cycle starts.
Sorry about this inconvenience, for the first invoice, the system can only accept credit card.
You can change your payment method to a bank payment/online banking after your first invoice.
It would be $49+tax of upgrading/moving fee.
Please check: WifiInfoView
Please download the manual for Hitron-CGN3 at Hitron CGN3 Modem User Guide
1. Open a browser, go to 192.168.0.1.
2. Login with username:cusadmin, password:password
3. On the top menu, click on Wireless.
4. Click on 2.4Ghz, open the list of Wireless Channel, choose one, click on Save Changes.
5. Click on 5Ghz, open the list of Wireless Channel, choose one, click on Save Changes.
You may need to change several times to find the best channel for your wireless connection.
1. Open a browser, go to 192.168.0.1.
2. Login with username:cusadmin, password:password
3. On the top menu, click on Wireless.
4. Click on Basic settings.
5. Click on 2.4Ghz, change Network Name (SSID) to your new 2.4Ghz WiFi name.
Click on 5Ghz, change Network Name (SSID) to your new 5Ghz WiFi name.
We suggest you use differet name for your 2.4Ghz WiFi and 5Ghz WiFi. You can use the this format: xxxx-2.4G and xxxx-5G
6. Cilck on WPS&Security.
7. Click on your 2.4Ghz WiFi name and change Pass phrade to your new 2.4Ghz WiFi password.
Click on your 5Ghz WiFi name and change Pass phrade to your new 5Ghz WiFi password.
You can use the same password for your 2.4Ghz WiFi and 5Ghz WiFi.
8. Cilck on save changes and wait for 1-2mins, then you can connect your WiFi with new settings.
Please follow the steps below:
1. Directly connect an Ethernet cable from the modem to the computer.
2. Open a web browser and enter the following address to access the gateway login page (Ip address: 192.168.0.1, Username: cusadmin, Password: password)
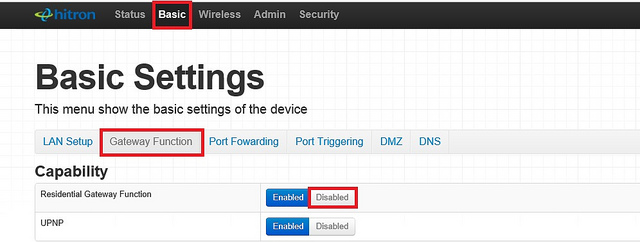
3. Once the Basic page has loaded, click the Gateway Function.
4. Toggle the Residential Gateway function box from Enabled to Disabled.
5. Click OK and the gateway will restart.
6. Once the modem is online, plug a device into port one to test their connectivity.
7. While in bridged mode, only port one will be active on the gateway.
8. If you want to put the modem back into gateway mode, factory reset the modem by pressing the reset button on the back for more than 10 seconds.
Please check file: RF-4350
Please check file: RF-CDA3
Please follow the steps below:
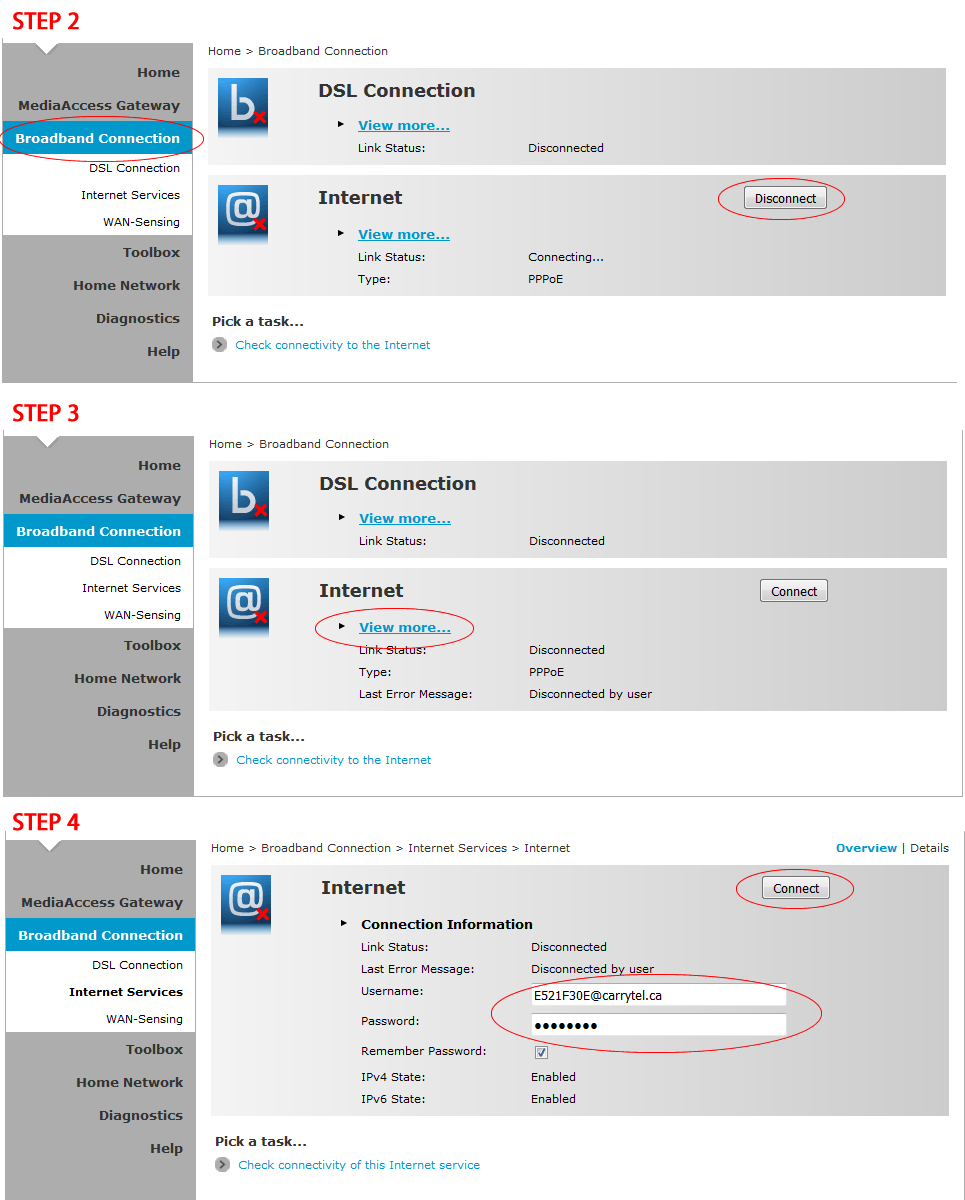
1. login into the modem (Ip address: 192.168.1.254, No username and password needed)
2. Click Broadband Connection. if you see Disconnect button, click the Disconnect button. if NOT, go to step 3
3. Click View more…
4. Put your ADSL username in username edit box, Put your ADSL password in password edit box, Click Connect button
Please follow the steps below:
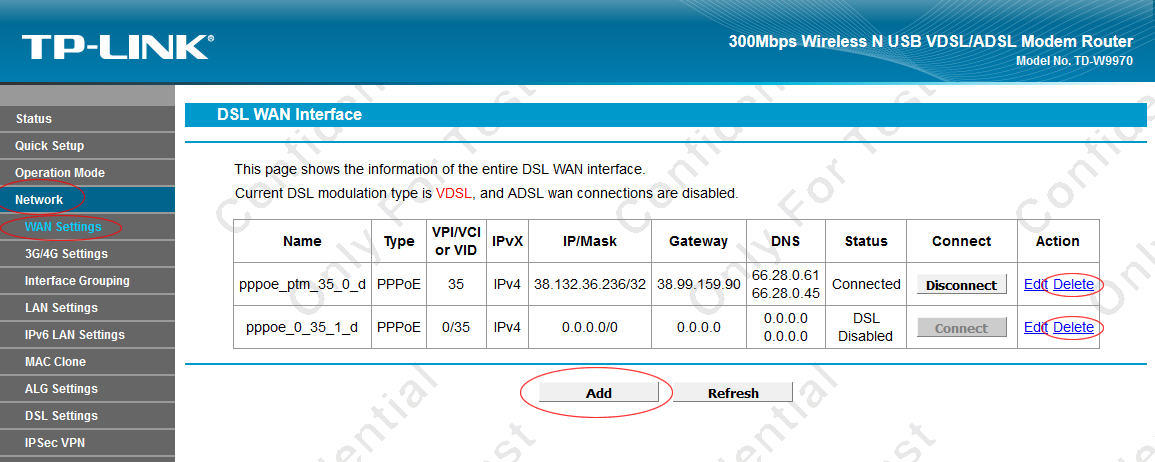
1. login into the modem (Ip address: 192.168.1.1, Username: admin, Password: admin)
2. Click Network
3. Click WAN Settings
4. Click Delete links to delete all exsiting connections
5. Click Add button
6. Check “Enable Vlan ID” option
7. Enter 35 for “VLAN ID (1-4094)” option
8. Choose Bridge for “Connection Type” option
9. Click Save button
Please follow the steps below:
1. login into the modem (Ip address: 192.168.1.254, No username and password needed)
2. Click MediaAccess Gateway, Confirm that your firmware is 10.A.C.3, Click Setup my MediaAccess Gateway
3. Click Next button in a popup window
4. Choose “VDSL Bridge”, Click Next button
5. Uncheck “Enable VLAN tagging”, Choose “ethport2” for Ethernet Port, Click Next button
6. Click Next button
7. Click Start button
8. Connect a network cable from Port 2 on Technicolor modem to Internet Port on your own router

Please follow the steps below:
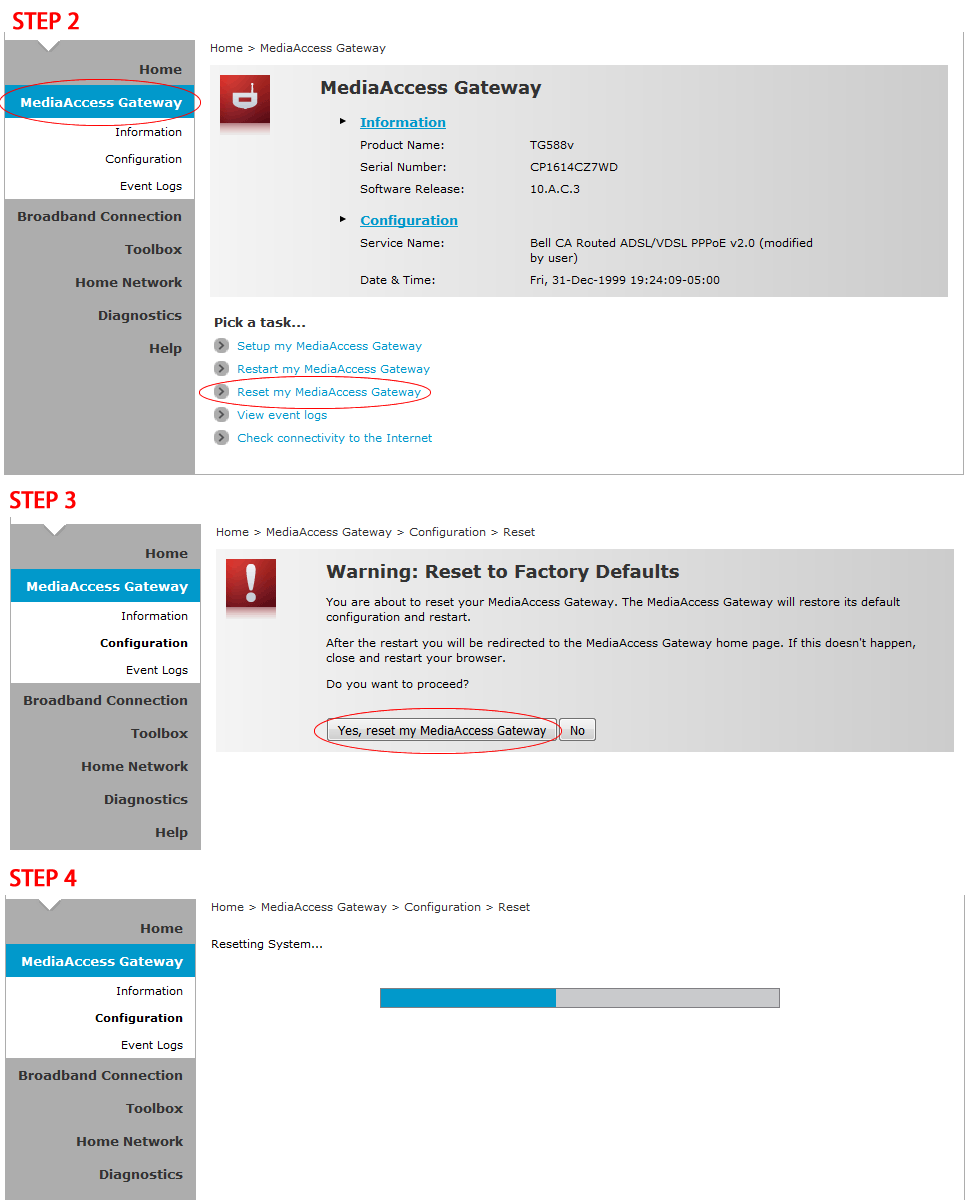
1. login into the modem (Ip address: 192.168.1.254, No username and password needed)
2. Click MediaAccess Gateway, Click Reset my MediaAccess Gateway
3. Click Yes, reset my MediaAccess Gateway
4. Wait 5 minutes for resetting process to be finished
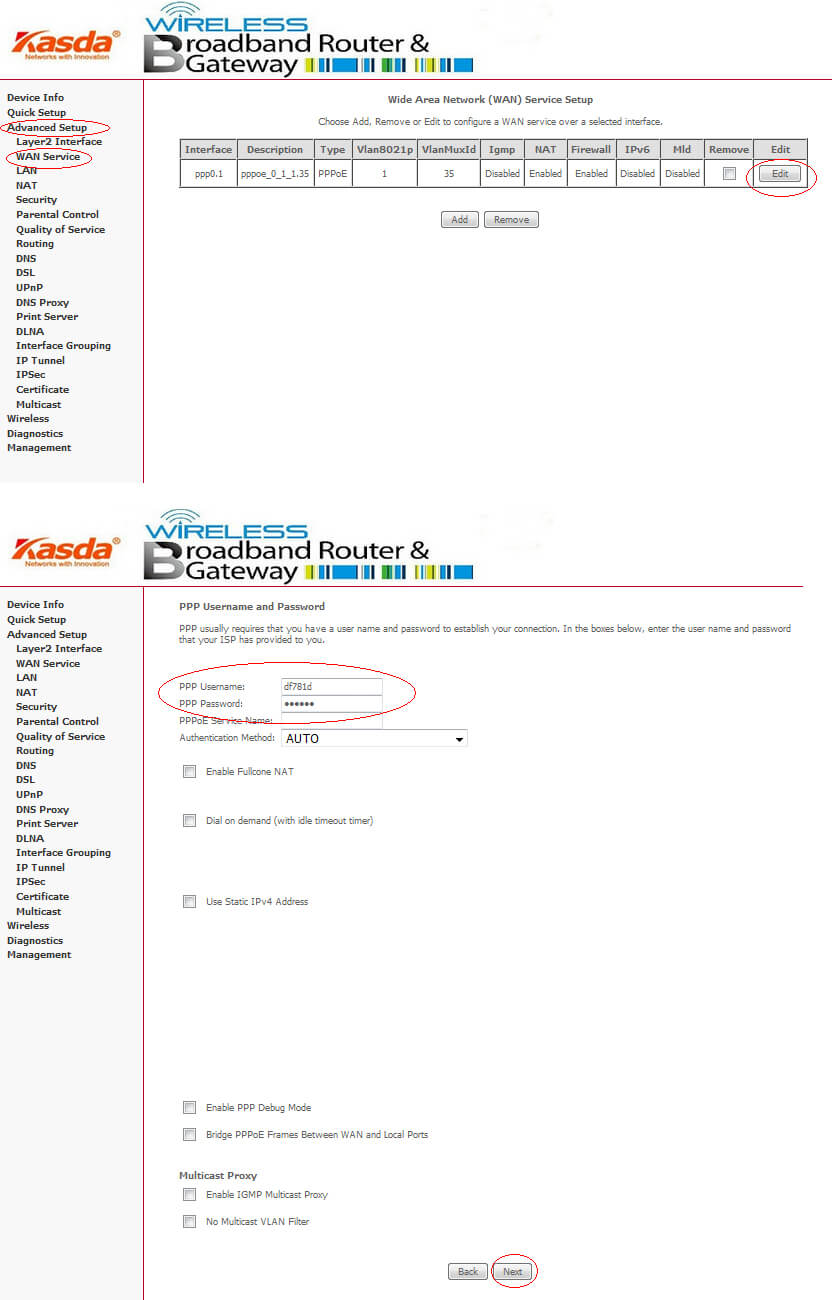
Please follow the steps below:
1. login into the modem (Ip address: 192.168.1.1, Username: admin, Password: admin)
2. Click Advanced Setup
3. Click WAN Service
4. Click Edit button
5. Modify the PPP Username and PPP Password on next screen
6. Click Next button
7. Click Apply/Save button
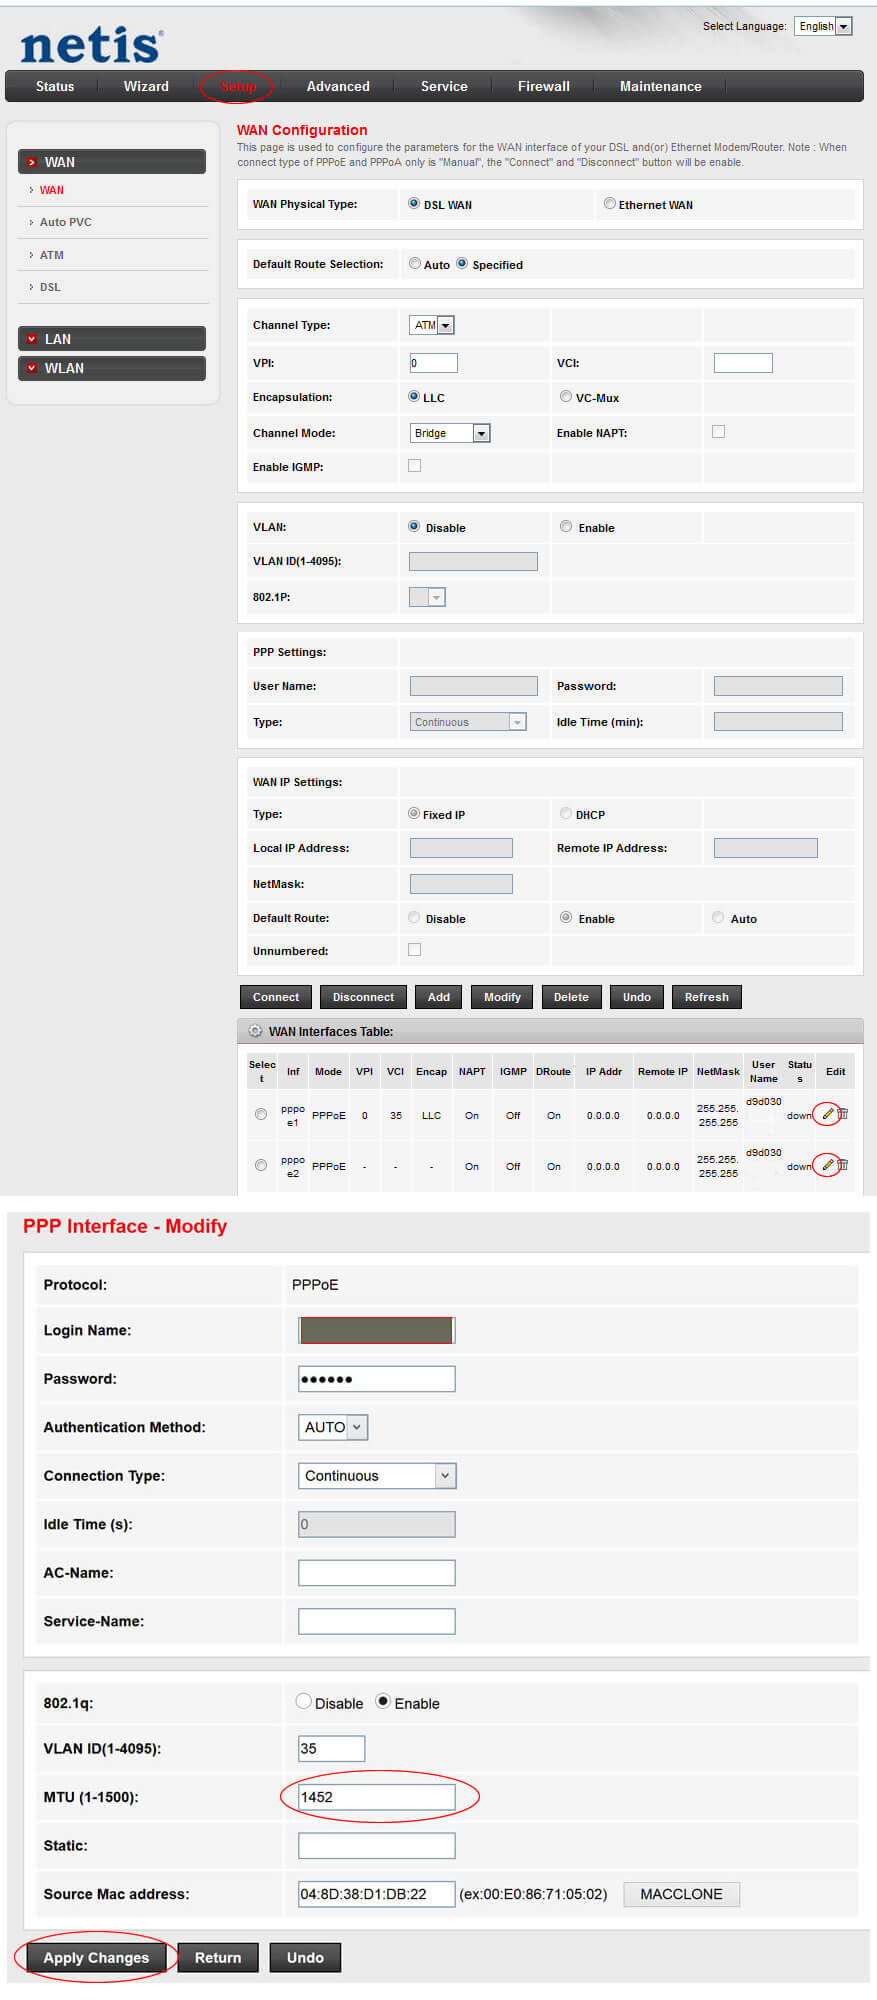
Some VPN software needs MTU numbers to be lower than 1452 (for modem setting) or 1392(for OS setting) in order to make it work. Please use one of the two following options to set up the correct MTU number for your VPN.
Option 1: Setup the MTU number to be 1452 or lower in your modem (we use Netis 4422 as an example)
1. login into the modem (Ip address: 192.168.1.1, Username: admin, Password: admin)
2. Click Setup
3. Click the pencil icons for both pppoe1 and pppoe2 interface on the bottom of the page
4. Change the MTU to 1452
5. Click Apply Changes
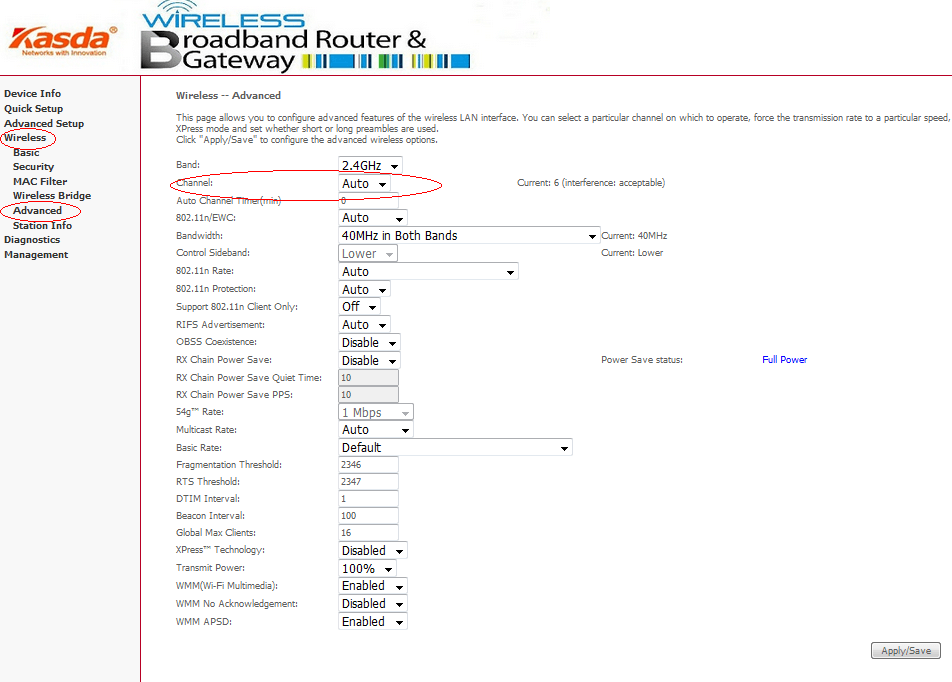
Please follow the steps below:
1. login into the modem (Ip address: 192.168.1.1, Username: admin, Password: admin)
2. Click Wireless
3. Click Advanced
4. Change the Channel
5. Click Apply/Save button
For instruction on how to set up the Kasda modem to bridge mode, please download the instructions at: PDF DOWNLOAD

